

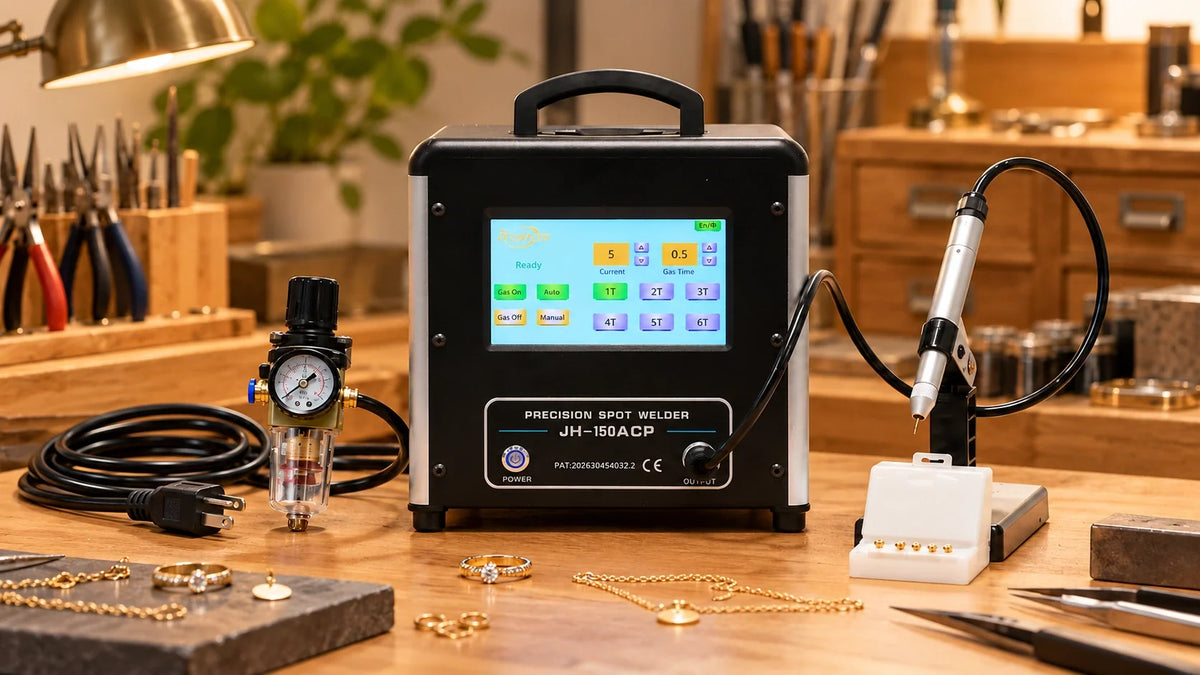
The Tooltos Touchscreen Precision Spot Welder for Jewelry Repair brings a more visible control workflow to the jewelry bench. Its front touchscreen places the current setting and gas time together, so an operator can review the selected values before starting a weld. The screen also provides direct controls for gas on and gas off, plus automatic and manual operating modes.
Visible setting
Separate adjustment
Auto and manual controls
For small workshops, that clear control layout matters. A welding setup is easier to document when the operator can read the selected mode and settings at the machine instead of relying on an unmarked dial or a remembered position. The benefit is visibility: settings are easier to check, but a sound joint still depends on preparation, testing and operator judgment.
A Touchscreen Built Around Repeatable Setup
The front display is organized around the adjustments used during operation. Current and gas time appear as separate values with up and down controls, keeping both settings visible rather than hidden behind a menu. The display also shows controls labeled 1T through 6T. Consult the supplied operating instructions for their exact functions; these labels alone do not confirm programmable memory or saved presets.
When a bench moves between recurring tasks, a written setup record can make a practical difference. Establish a starting setup for a particular component, test it on matching practice material, and record the selected settings and result. The correct values still depend on the metal, joint design, thickness, electrode condition and shielding gas setup, so a new job should begin with a controlled test rather than an assumed setting.
Choosing Automatic or Manual Operation
Automatic and manual mode controls are available directly on the screen. Before selecting either, check the operating instructions for the activation sequence and handpiece behavior. The mode names should not be read as a promise of automatic parameter selection or unattended welding.
| Screen control | What to confirm before use |
|---|---|
| Auto | Check the automatic activation sequence in the manual. Do not assume unattended operation. |
| Manual | Check the required operator actions and handpiece behavior in the manual. |
| 1T through 6T | Verify each function before selecting it. Labels alone do not establish saved presets. |
Neither mode removes the need for careful preparation. Parts should fit correctly, joint surfaces should be clean, and test welds should be inspected before continuing.
A digital workflow makes settings easier to see and record; it does not turn an untested weld into a production-ready one.
Setting Up the Handpiece and Gas Supply
The machine has a front output connection for the welding handpiece. Product images show a handpiece, a handpiece stand and gas control components. Confirm the exact supplied configuration before ordering. At the bench, support the handpiece when it is not in use, route leads clearly and keep gas controls accessible to the operator.
At the Workbench
Support the handpiece, keep leads clearly routed and leave gas controls accessible.
Before Ordering
Confirm the supplied accessories, required argon setup and power version for your workshop.
Before Connecting Power
Before installation, confirm these items in the supplied manual or product listing:
- The machine's rated input voltage and plug type
- Argon supply requirements
- Compatible consumables
Voltage reminder: Do not assume that one unit automatically accepts both 110 V and 220 V.
Follow the specified connection procedure, provide suitable ventilation and use appropriate welding eye protection and other required protective equipment.
Where It Fits in a Jewelry Workflow
This precision spot welder is relevant to jewelry workshops looking for a compact, screen-led station for compatible small metal joining and repair tasks. Its visible controls can help teams document bench procedures and teach operators to review a setup before welding. Material compatibility must still be confirmed for each application, especially with coated parts, precious metals or heat-sensitive components.
The best first step is to prepare the workstation, test on matching practice material, and record the operating mode, current setting, gas time and result.
01 Prepare
Check the workstation, connections and joint surfaces.
02 Test
Use matching practice material and inspect the test weld.
03 Record
Note the mode, current, gas time and observed result.
That record makes the display part of a repeatable workshop process, rather than simply a set of controls. To compare related equipment, browse the Tooltos jewelry welding machines and spot welders collection.
Contact Tooltos
For product questions, technical assistance, or order support, contact the Tooltos team at sales@tooltos.com. We respond within 24 hours on business days.
0 commentaire