

An incomplete first lost wax casting can tempt a maker to change every setting at once. A better starting point is to separate mold preparation from the melt and vacuum casting stage. A correct burnout program cannot compensate for too little metal, an unsuitable sprue path, or a casting setup that is not ready when the flask is hot.
Start with the process, not a higher temperature.
Check flask preparation, metal charge, sprue flow, and the vacuum setup before changing several settings. Record each test and change one meaningful variable at a time.
YOUR TROUBLESHOOTING ROUTE
-
01Prepare
Confirm flask and burnout readiness. -
02Measure
Include the sprues and button in the charge. -
03Check
Inspect the vacuum setup before pouring. -
04Review
Record the result before the next test.
Confirm the Flask Is Ready Before Melting
Complete the wax model, sprue, investment, and burnout stages before treating the casting machine as the next solution. Use the instructions for the specific resin or wax and investment. Castable resin should not automatically use a wax schedule. Confirm that the flask fits the casting setup and can be handled safely at the specified casting temperature.
The flask needs to be ready before metal is melted. Have the work area, tools, hose connection, and heat protection prepared first.
Before melting checklist
- Wax or resin and investment instructions have been checked.
- The appropriate burnout process is complete.
- Flask fit and safe handling arrangements are confirmed.
- Tools, connections, and heat protection are ready.
Calculate the Metal Charge Including Sprues and Button
Metal that only reaches the beginning of the button is not a reliable starting condition. The button and sprue system serve a function during solidification, so the total charge must cover more than the visible jewelry shape. Use the casting system guidance to calculate the required metal amount for the mold, sprues, and button. Add metal deliberately rather than estimating from the finished piece alone.
Think beyond the finished piece
Use your casting system guidance to determine the actual charge. This is a planning reminder, not a weight formula.
Use clean, compatible metal and keep alloy choices consistent for a test series. Record the alloy, charge weight, flask size, and result.
Check the Vacuum Setup Before the Pour
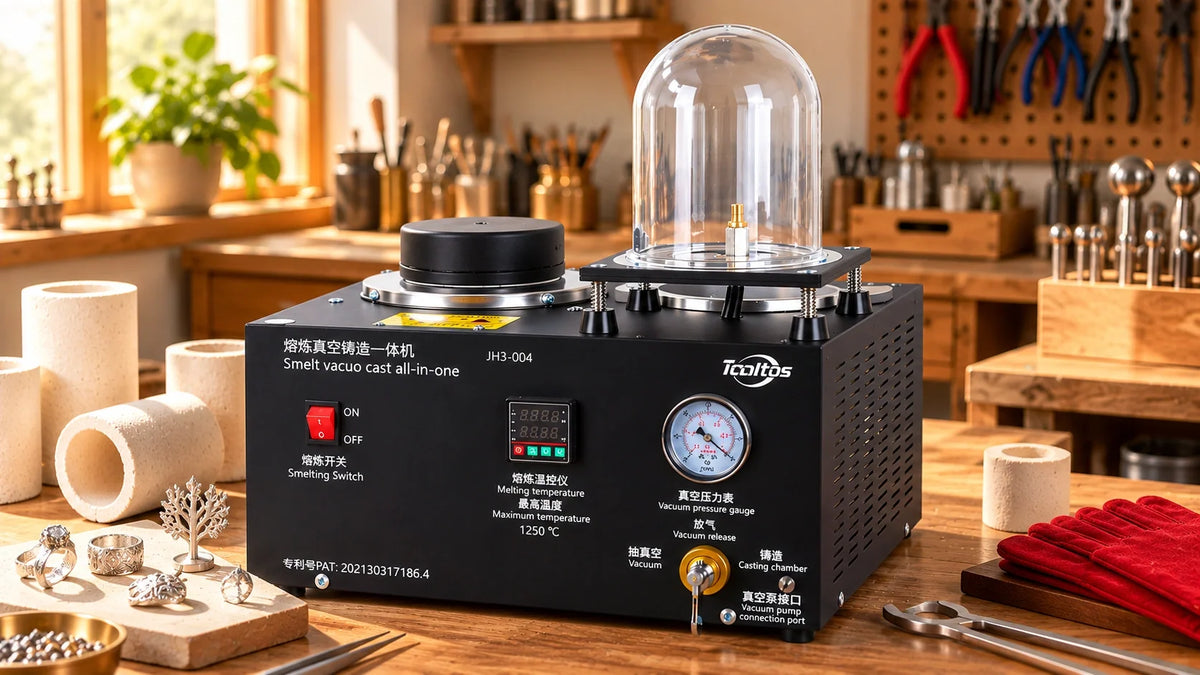
The Tooltos 1050°C Jewelry Vacuum Casting and Melting Machine combines melting and vacuum assisted casting for small lost wax workflows. It is offered with 1 kg, 2 kg, or 3 kg graphite crucible options and uses a separate vacuum pump. The product listing specifies a minimum 2 L pump; the pump is required for operation and is not included with the machine. Confirm pump compatibility before purchase.
Check the vacuum system before the pour. Inspect the hose connections and relevant seals, observe the pressure gauge, and confirm that the hot flask is positioned correctly for the casting arrangement. Use the hood and casting components as directed in the machine instructions. Vacuum assistance does not repair a blocked sprue, incomplete burnout, or inadequate metal volume.
Equipment boundary: The vacuum stage is one part of the workflow. It cannot replace proper burnout, a clear sprue route, or sufficient metal. A separate compatible pump is required for this machine.
Treat Casting Temperature as a Material Specific Decision
This machine has a recommended working setting of 1050°C (1922°F) and a rated maximum of 1250°C (2282°F). The maximum rating is not a routine operating target. Tooltos also notes that the actual chamber temperature can overshoot the displayed setting by 50 to 100°C (90 to 180°F). Check the casting requirements for the specific alloy and investment, and confirm that the equipment is suitable. Do not raise the setting simply because a first attempt failed, and avoid sustained operation near the maximum temperature.
1050°C
1922°F
Recommended setting
Subject to material compatibility.
1250°C
2282°F
Rated maximum
Not a routine target.
+50–100°C
+90–180°F
Reported overshoot
Chamber temperature above the displayed setting.
The machine needs a full cool down to room temperature after a casting cycle, following the equipment instructions. Repeated hot cycles can build heat in the equipment and affect its service life. Plan test runs so you can cool safely, document the result, and change only one meaningful variable before casting again.
Use the Casting Result to Choose the Next Check
If the mold does not fill, review the metal charge, sprue route, flask preparation, and vacuum seal before changing several temperatures. If the surface is poor, return to the model material, investment process, and burnout compatibility. These are starting points for troubleshooting, not a diagnosis from appearance alone. A vacuum casting machine is valuable when it makes the melting and vacuum stage repeatable. It is not a substitute for the preparation stages around it.
| What you observe | What to review first |
|---|---|
| Incomplete fill | Metal charge, sprue route, flask preparation, and vacuum seal. |
| Poor surface quality | Model material, investment process, and burnout compatibility. |
| Several settings changed | Return to a documented baseline and isolate one meaningful variable per test. |
Use these checks to guide investigation, not to identify a single cause from appearance alone.
Keep a simple casting test log
Record the alloy, metal charge, flask size, burnout reference, temperature settings, vacuum observations, result, and the single change planned for the next test.
Complete the cycle → Cool fully → Review notes → Plan one change
For a complete setup, choose casting equipment by alloy compatibility, crucible capacity, vacuum pump requirements, flask size, voltage, and the production volume you actually need. Explore Tooltos jewelry casting and wax equipment after mapping those requirements.
Contact Tooltos
Need help choosing casting equipment or confirming machine and vacuum pump compatibility? Contact the Tooltos team at sales@tooltos.com.
For an equipment question, include your machine model, alloy, flask size, and a brief description of your setup so we can better understand your needs.
0 comentarios